Are you ready to elevate your snacking game? These Crunchy Air-Fried Chickpea and Quinoa Bites are not just tasty—they're packed with protein and flavor! I’ll guide you through simple steps, using everyday ingredients to create delightful bites that everyone will love. Whether you’re preparing for a party or enjoying a healthy snack, these bites are your new go-to. Let’s get cooking and have some fun in the kitchen!
Why I Love This Recipe
- Healthy and Nutritious: These bites are packed with protein and fiber from chickpeas and quinoa, making them a wholesome snack option.
- Easy to Make: With just a few simple ingredients and steps, these bites come together quickly, perfect for a busy weeknight.
- Customizable Flavor: Feel free to adjust the spices or add your favorite herbs to tailor the flavor to your liking.
- Great for Meal Prep: These bites store well in the fridge, making them a convenient option for quick meals or snacks throughout the week.
Ingredients
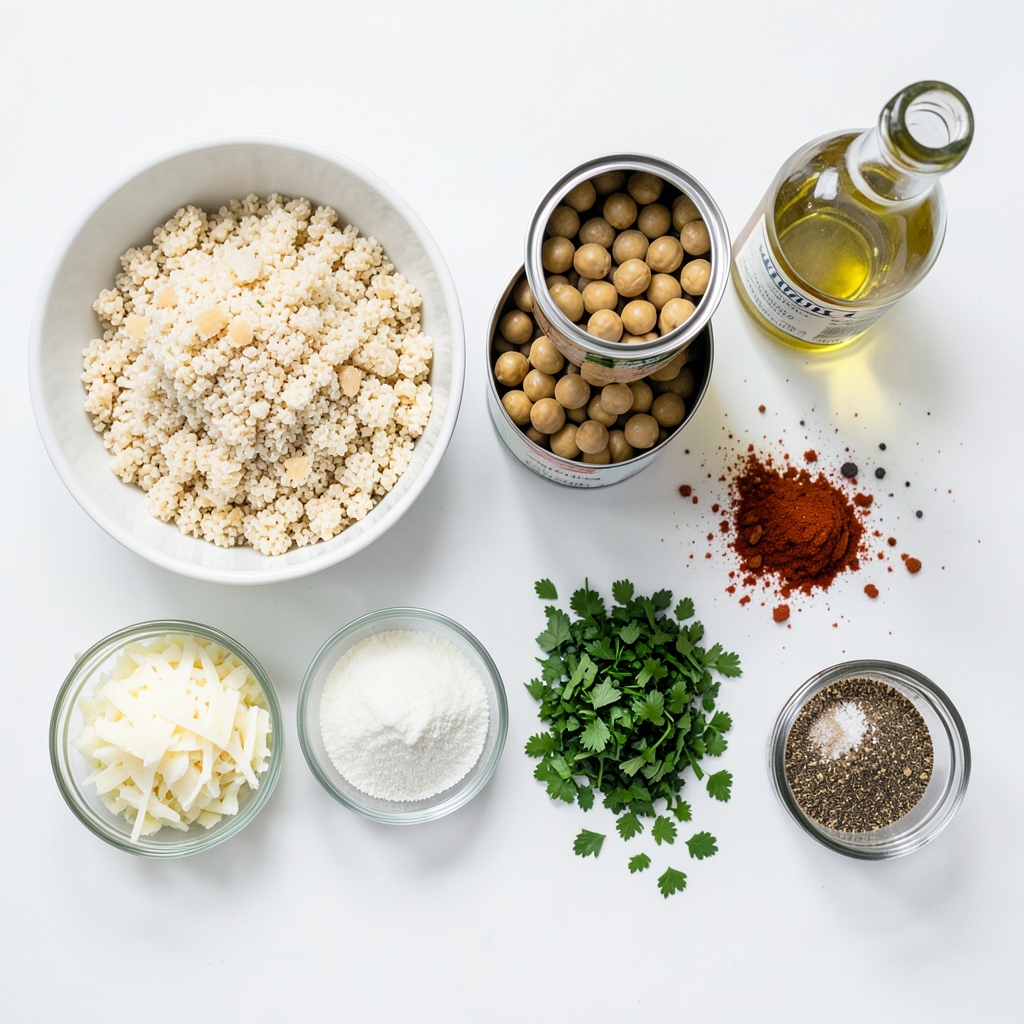
- 1 cup cooked quinoa
- 1 can (15 oz) chickpeas, thoroughly rinsed and drained
- 1/4 cup breadcrumbs (opt for gluten-free if preferred)
- 1/4 cup grated Parmesan cheese (substitute with nutritional yeast for a vegan option)
- 2 tablespoons fresh parsley, finely chopped
- 1 teaspoon garlic powder
- 1 teaspoon onion powder
- 1 teaspoon smoked paprika
- Salt and pepper, to taste
- 1 tablespoon olive oil
- Optional: 1/4 teaspoon cayenne pepper for an extra kick
These ingredients create a healthy and tasty treat. Each one plays a key role.
The cooked quinoa gives the bites a nice base. It adds protein and keeps them light. Chickpeas add a creamy texture and more protein. I always rinse them well to remove any canning liquid.
Breadcrumbs help bind the mixture. I like using gluten-free ones if needed. Parmesan cheese adds a savory flavor. If you want a vegan option, nutritional yeast works well.
Fresh parsley gives a bright taste and looks nice. Garlic powder, onion powder, and smoked paprika add depth. Salt and pepper bring all the flavors together.
Olive oil keeps everything moist and helps with crispiness. If you like heat, cayenne pepper is optional. It gives a nice kick!
Gather these ingredients, and you are ready to make something special.
Step-by-Step Instructions
Preparing the Mixture
In a large bowl, combine 1 cup of cooked quinoa with 1 can of chickpeas. Rinse the chickpeas well and drain them. With a fork or a potato masher, mash the chickpeas gently. I like to leave some whole for a nice texture. This adds a bit of crunch.
Next, add in the breadcrumbs, 1/4 cup of grated Parmesan cheese, and 2 tablespoons of finely chopped parsley. Mix in 1 teaspoon of garlic powder, 1 teaspoon of onion powder, and 1 teaspoon of smoked paprika. Don’t forget to add salt and pepper to taste. If you want some heat, toss in 1/4 teaspoon of cayenne pepper. Drizzle 1 tablespoon of olive oil over the mixture. Mix it all well until it forms a cohesive mass.
Shaping and Cooking
Now, preheat your air fryer to 375°F (190°C). This step is key for getting that perfect crunch. While the air fryer heats up, take small portions of the mixture and shape them into bite-sized balls or patties. Press them firmly to keep their shape.
Once shaped, lightly spray the air fryer basket with non-stick spray. Carefully place the chickpea and quinoa bites in a single layer in the basket. Make sure they don’t touch each other. This helps them cook evenly.
Air Frying
Cook the bites for about 12-15 minutes. Remember to flip them halfway through for even cooking. To check for doneness, look for a golden brown color. They should be crispy on the outside and soft on the inside. After cooking, let them cool for a few minutes before serving.
Tips & Tricks
Perfecting Texture
Leaving some chickpeas whole adds a nice crunch. Whole chickpeas give your bites a fun texture. If you mash them all, you lose that bite. Mix the ingredients well to ensure every part sticks together. A good mix helps the bites hold their shape when you cook them.
Achieving Crispiness
Preheating the air fryer is key. It helps your bites cook evenly and get crispy. Make sure to set your air fryer to 375°F (190°C) for about five minutes. Using non-stick spray makes a big difference. It helps prevent sticking and gives a perfect golden color.
Serving Suggestions
Dips can really enhance your bites. Try serving them with tzatziki or hummus. Both add great flavor and moisture. For a nice touch, garnish with fresh parsley or lemon wedges. This adds color and makes your dish look beautiful.
Pro Tips
- Texture Matters: For the best crunch, ensure you leave some chickpeas whole when mashing. This adds a delightful texture to your bites.
- Flavor Boost: Experiment with different spices like cumin or coriander in addition to the smoked paprika for a unique flavor profile.
- Preheat for Perfection: Always preheat your air fryer for a few minutes before cooking. This ensures that the bites cook evenly and get that perfect crispy texture.
- Batch Cooking: Make a larger batch and freeze uncooked bites. They can be air-fried directly from the freezer for a quick snack later.
Variations
Nutritional Substitutions
For a vegan option, I suggest using nutritional yeast instead of Parmesan cheese. Nutritional yeast gives a cheesy flavor without dairy. It also adds extra vitamins. For gluten-free bites, choose gluten-free breadcrumbs. Many options are available in stores. They work just as well in this recipe.
Flavor Enhancements
You can boost flavor by adding different spices or herbs. Consider mixing in cumin or chili powder for a warm touch. Fresh herbs like cilantro or basil can also enhance the taste. Adding vegetables is another great way to change things up. Try finely chopped spinach or bell peppers for added nutrition and flavor.
Serving Alternatives
Transforming these bites into a salad topping is easy. Just chop them up and sprinkle them over greens. They add protein and crunch. You can also mix them with grains for a filling bowl. Quinoa or brown rice pairs nicely. This adds more texture and makes for a hearty meal.
Storage Info
Refrigeration Tips
To store leftovers, let the bites cool completely first. Place them in an airtight container. This helps keep them fresh. I recommend using glass containers or high-quality plastic ones. They seal well and help maintain taste.
Freezing Options
If you want to keep them longer, freezing is great. Just place the bites on a baking sheet first. Freeze them for about an hour until solid. Then transfer them to a freezer bag or container. This helps prevent sticking. For reheating, bake them at 375°F (190°C) for about 10-12 minutes. Check to ensure they are heated through.
Freshness Tips
To maintain taste, store them in the fridge. They stay good for about three days. When you freeze them, they last up to three months. Always check for any off smells or changes in texture before eating. This ensures you enjoy the best flavor possible.
FAQs
How long do Crunchy Chickpea and Quinoa Bites last?
Crunchy chickpea and quinoa bites last about 3 to 5 days in the fridge. Store them in an airtight container to keep them fresh. If you want to save them longer, you can freeze the bites. They stay good in the freezer for up to 3 months. Just make sure to use a freezer-safe container.
Can I make these bites ahead of time?
Yes, you can make these bites ahead of time. Prepare the mixture and shape it into balls or patties. Then, store them in the fridge for up to a day before cooking. If you plan to freeze them, do so before cooking. Just thaw them in the fridge overnight before air-frying.
What can I serve with Crunchy Chickpea and Quinoa Bites?
These bites pair well with a variety of dips. Try serving them with tzatziki or hummus for a tasty combo. They also work great on a salad or as a topping for grain bowls. Add fresh veggies or a squeeze of lemon for extra flavor.
How do I make these bites spicier?
To make these bites spicier, add cayenne pepper to the mixture. Start with 1/4 teaspoon for a mild kick. You can also use hot sauce or red pepper flakes for more heat. Adjust the spice level to match your taste. Remember, you can always add more spice, but you can't take it out!
You now have a guide for making Crunchy Chickpea and Quinoa Bites. We covered the key ingredients, easy steps, and useful tips. You learned how to make them crispy and delicious with different flavors. Remember to store leftovers properly so they stay fresh. Feel free to experiment with spices and dips. Enjoy your cooking and impress others with these tasty bites!