
Are you ready to enjoy a warm bowl of creamy goodness? My Creamy Roasted Garlic Cauliflower Soup Delight is rich, flavorful, and easy to make. With just a few simple ingredients, you’ll savor roasted cauliflower and garlic mixed with your choice of creamy broth. Perfect for chilly nights or meal prep, this soup hits the spot every time. Let’s dive in and explore how to make this delightful dish!
Why I Love This Recipe
- Comforting Flavor: This soup combines the warm, comforting flavors of roasted garlic and cauliflower, making it a perfect dish for cozy nights.
- Simple Ingredients: Made with just a few wholesome ingredients, this recipe is easy to prepare while still delivering rich and satisfying taste.
- Dairy-Free Option: Using coconut milk makes this soup a fantastic dairy-free alternative without sacrificing creaminess or flavor.
- Versatile Dish: This soup can be enjoyed on its own or paired with crusty bread, making it a versatile choice for any meal.
Ingredients
Main Ingredients
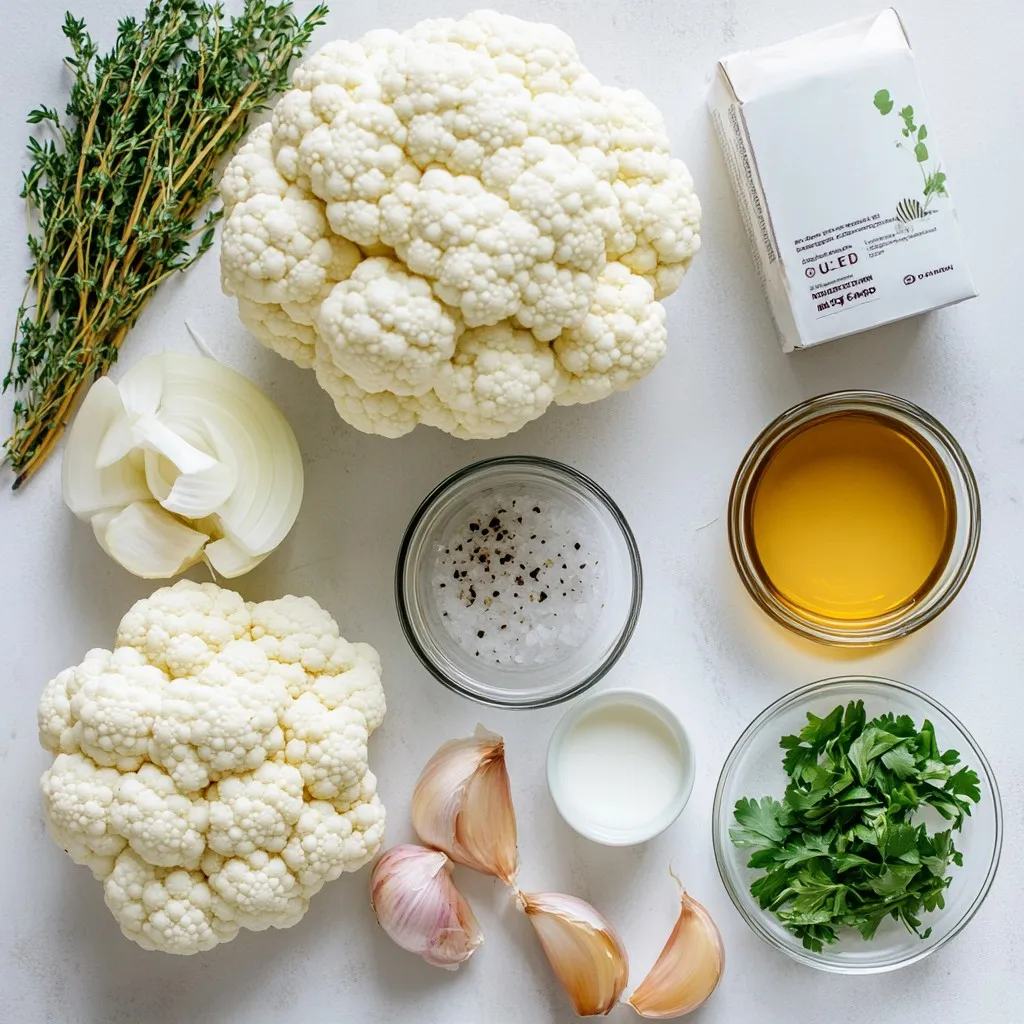
– 1 large head of cauliflower, trimmed and cut into florets
– 10 cloves of garlic, skin left on
– 2 tablespoons of olive oil, divided
– 1 medium onion, finely chopped
The main star of this soup is cauliflower. It gives a smooth and creamy base. I love using a large head of cauliflower. It provides enough flavor for everyone. Garlic is another key player. Roasting it brings out sweetness and depth. Use ten cloves for a rich taste. Olive oil adds a lovely richness. I use two tablespoons for roasting and cooking. Lastly, a medium onion gives a nice savory note.
Broth and Cream Options
– 4 cups vegetable broth
– 1 cup coconut milk (for a dairy-free option) or heavy cream (for a richer taste)
When it comes to broth, I always choose vegetable broth. It keeps the soup light yet flavorful. For creaminess, you can use coconut milk or heavy cream. Coconut milk makes it dairy-free and adds a hint of sweetness. Heavy cream gives a richer flavor. It’s all about what you prefer!
Seasonings and Garnish
– 1 teaspoon dried or fresh thyme
– Salt and black pepper, to taste
– Fresh parsley, finely chopped (for garnish)
Seasoning is vital in this soup. I use thyme for its earthy aroma. Just one teaspoon does the trick. Salt and black pepper are essential too. They bring out all the flavors. Top the soup with fresh parsley for color and freshness. It adds a nice crunch to each spoonful.
Step-by-Step Instructions
Prepping the Ingredients
First, you need to trim and cut the cauliflower. Start by removing the leaves and the stem. Then, cut the cauliflower into small florets. This helps them roast evenly. You can also peel the garlic if you want, but I like to keep it in the skin. Roasting the garlic in its skin keeps it sweet and soft.
Roasting the Cauliflower and Garlic
Next, it’s time to roast. Preheat your oven to 400°F (200°C). On a large baking sheet, mix the cauliflower florets and unpeeled garlic cloves. Drizzle with 1 tablespoon of olive oil. Toss everything well so it’s all coated. Spread them out in a single layer. Roast the mixture for about 25-30 minutes. You want the cauliflower to be tender and golden, and the garlic should be soft when done.
Cooking the Soup
While your cauliflower and garlic roast, let’s cook the soup. Heat the remaining tablespoon of olive oil in a large pot over medium heat. Add the chopped onion and sauté for about 5 minutes. Stir often until the onion becomes soft and clear. Once the cauliflower and garlic are out of the oven, squeeze the roasted garlic from its skins into the pot. Add the roasted cauliflower as well. Pour in 4 cups of vegetable broth and stir in the thyme, salt, and pepper. Increase the heat until it boils, then lower it to a simmer for about 10 minutes.
Blending and Creaming
After the soup has simmered, it’s time to blend. Remove the pot from heat. If you have an immersion blender, use it to blend the soup until it’s creamy. If you don’t, carefully transfer the soup to a regular blender. Remember to be careful with the hot liquid! After blending, stir in 1 cup of coconut milk or heavy cream for richness. Adjust the seasoning with more salt and pepper, if needed.
Final Seasoning and Serving
To serve the soup, ladle it into warm bowls. You can drizzle some extra coconut milk on top for a nice swirl. Finish with a sprinkle of fresh parsley for a pop of color. This adds a fresh touch and makes it look great. Enjoy your warm bowl of creamy roasted garlic cauliflower soup!
Tips & Tricks
Perfecting the Roasting Process
To achieve golden cauliflower, follow these simple steps:
– Use high heat. Roast at 400°F (200°C).
– Spread florets out. This allows air to circulate.
– Drizzle with olive oil. This helps with browning.
For soft roasted garlic:
– Keep the skins on. This protects the garlic while roasting.
– Roast the garlic with cauliflower. They cook together perfectly.
– Roast for 25-30 minutes. Check for softness after the time is up.
Blending Techniques
When it comes to blending, I have strong feelings about immersion versus standard blenders.
Immersion Blender:
– Pros: Easy to use, blends directly in the pot, less cleanup.
– Cons: May not achieve total smoothness if not used properly.
Standard Blender:
– Pros: Typically creates a creamier texture.
– Cons: Use caution with hot liquids, and blend in small batches.
Adjusting Thickness and Creaminess
To get your soup to the right texture:
– Start with the broth. This is your base.
– Add coconut milk or heavy cream. This will add richness.
– Blend thoroughly until smooth. Check the thickness after blending.
For variations in cream:
– Use full-fat coconut milk for a dairy-free option.
– Heavy cream adds a richer flavor but is not vegan.
– Adjust the amount based on how creamy you like your soup.
Pro Tips
- Use Fresh Ingredients: For the best flavor, use fresh cauliflower and garlic. This will enhance the overall taste of the soup.
- Adjust Texture: If you prefer a chunkier soup, blend only half of the mixture and leave some cauliflower pieces whole for added texture.
- Roasting Variations: Experiment with roasting additional vegetables like carrots or leeks alongside the cauliflower for a more complex flavor profile.
- Garnish Creatively: Add a swirl of olive oil or a sprinkle of nutritional yeast on top before serving to elevate the presentation and flavor.
Variations
Ingredient Substitutions
You can swap out the broth in this soup. Use chicken broth for more flavor. If you want a lighter taste, use water instead. Adding potatoes or carrots can make it heartier. Both vegetables mix well with the roasted garlic and cauliflower. Just chop them and add them to the pot when you combine the roasted ingredients.
Flavor Enhancements
To boost the soup’s flavor, consider adding spices. A teaspoon of paprika adds a nice warmth. Curry powder gives it a unique twist, too. Fresh herbs like basil or dill can brighten the soup. Adding these spices or herbs can change the whole vibe of your soup.
Dietary Modifications
If you want a vegan-friendly option, use coconut milk and vegetable broth. They keep the soup rich and creamy without dairy. For gluten-free options, stick to vegetable broth and check your cream choice. Both coconut milk and heavy cream are gluten-free, so you can enjoy this soup without worry.
Storage Info
Storing Leftovers
To keep your creamy roasted garlic cauliflower soup fresh, let it cool down first. This step helps prevent moisture buildup. Once cooled, transfer it to an airtight container. Glass containers are great since they do not absorb smells. If you use plastic, ensure it is BPA-free. Store the soup in the fridge for up to five days.
Reheating Techniques
You can heat your soup on the stovetop or in the microwave. For stovetop reheating, pour the soup into a pot. Heat it over low to medium heat, stirring often. This method warms the soup evenly. If you’re in a hurry, use the microwave. Place the soup in a microwave-safe bowl. Heat in short intervals of one minute, stirring in between until hot.
Freezing Recommendations
To freeze your soup, first cool it completely. Pour the soup into freezer-safe bags or containers. Leave some space at the top, as the soup will expand when frozen. Label the bags with the date. This soup can last up to three months in the freezer. To thaw, place the frozen soup in the fridge overnight. Reheat it on the stovetop or in the microwave as mentioned above. Enjoy your delicious soup anytime!
FAQs
What is the best way to roast garlic?
Roasting garlic brings out its sweet and mellow flavor. To roast garlic, first, preheat your oven to 400°F (200°C). Take whole garlic bulbs and slice off the top to expose the cloves. Drizzle with olive oil and wrap in foil. Place it in the oven and roast for about 30-35 minutes. The garlic will be soft and golden. You can easily squeeze the roasted garlic out of its skin. Use it in your soup for rich flavor.
Can I use frozen cauliflower?
Yes, you can use frozen cauliflower! It is a great time-saver. When using frozen cauliflower, you do not need to thaw it before cooking. Just add it directly to your pot with the other ingredients. However, the soup may be slightly less creamy. To counter this, add a bit more coconut milk or cream during blending.
How long does this soup last in the fridge?
This soup lasts about 4-5 days in the fridge. Store it in an airtight container to keep it fresh. Be sure to let it cool completely before placing it in the fridge. Check for any changes in smell or texture before enjoying it again.
Can I add protein to this soup?
Absolutely! You can add protein to make the soup heartier. Cooked chicken, turkey, or bacon can work well. If you prefer plant-based options, try adding lentils or chickpeas. Just stir them in during the simmering stage. This addition will boost the nutrition and flavor of your creamy roasted garlic cauliflower soup.
This blog post covered how to make a delicious cauliflower soup. You learned about key ingredients like cauliflower, garlic, and broth options. I shared step-by-step instructions, tips for perfect roasting, and ways to enhance flavors. You also got ideas for storing leftovers and variations for different diets.
In closing, this soup is not only tasty but also flexible. It fits many diets and can be your new go-to dish. Enjoy experimenting with flavors and sharing this healthy meal with other