Do you crave a sweet treat that’s easy to make? Look no further! Classic Rice Krispie Treats are simple, fun, and delicious. With just six ingredients, you can whip up a batch in no time. Imagine gooey marshmallows mixed with crispy cereal to create the perfect dessert. In this blog post, I’ll guide you through each step to make these delightful treats and share tips for fun variations. Let’s get started!
Why I Love This Recipe
- Quick and Easy: This recipe comes together in no time, making it perfect for last-minute treats or snacks.
- Customizable: You can easily add your favorite mix-ins like chocolate chips or colorful sprinkles to make it your own.
- Kid-Friendly: Kids love these crispy treats, and making them together can be a fun family activity.
- Perfect for Any Occasion: Whether it’s a birthday party, holiday gathering, or just a sweet craving, these treats are always a hit!
Ingredients
List of Ingredients
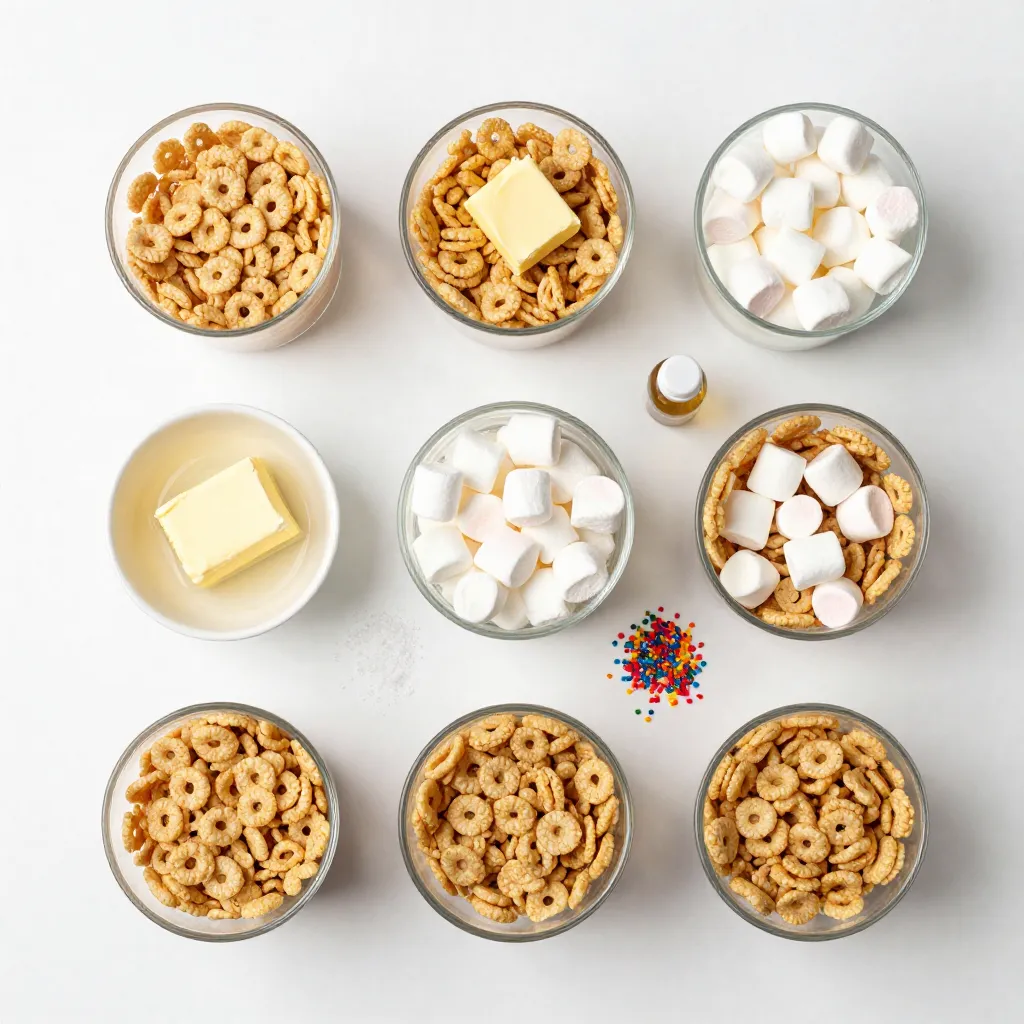
– Rice Krispies cereal: 6 cups
– Unsalted butter: 4 tablespoons
– Mini marshmallows: 1 package (10 oz) + 1 cup extra
– Vanilla extract: 1 teaspoon
– Salt: Pinch
– Optional decorations: Rainbow sprinkles or chocolate chips
Gathering the right ingredients is key to making the best Rice Krispie treats. I love using fresh ingredients to get a crisp and gooey texture. Start with 6 cups of Rice Krispies cereal. This cereal gives the treats their signature crunch. Next, you need 4 tablespoons of unsalted butter. Butter adds richness and helps bind the mix.
For sweetness and that classic marshmallow flavor, grab 1 package of mini marshmallows, which is usually 10 ounces. Don’t forget to add 1 cup of extra mini marshmallows for extra gooeyness. The more marshmallows, the better!
You will also need 1 teaspoon of vanilla extract. This small amount boosts the overall flavor. Finally, add a pinch of salt to balance the sweetness. If you want to make your treats more festive, consider optional decorations like rainbow sprinkles or chocolate chips. These can make your treats stand out and add a fun touch!
Step-by-Step Instructions
Melting the Butter and Marshmallows
Start by placing a large saucepan on the stove. Set the heat to low. Add 4 tablespoons of unsalted butter to the pan. Let it melt slowly. Stir the butter gently as it melts. This keeps it from burning. Once the butter is fully melted, add a package of mini marshmallows. Stir continuously. This step is key for a smooth mixture. If you stop stirring, the marshmallows may clump. Keep stirring until everything is melted and creamy.
Combining Ingredients
Take the saucepan off the heat. Now, mix in 1 teaspoon of vanilla extract and a pinch of salt. This adds flavor to your treats. Next, it’s time for the Rice Krispies. Gradually add 6 cups of Rice Krispies cereal into the marshmallow mixture. Stir gently but thoroughly. You want each piece of cereal to be coated evenly. This makes sure every bite is tasty. Finally, fold in 1 cup of extra mini marshmallows. These will create gooey pockets in your treats.
Pressing and Setting
Prepare a 9×13 inch baking dish. Lightly grease it with butter or non-stick spray. This helps the treats come out easily. Pour the marshmallow-cereal mixture into the dish. Use a greased spatula or your damp hands to press it down. Make sure to press evenly. This helps the treats hold their shape. Let the mixture set at room temperature for about 30 minutes. You want it to feel firm to the touch. Once set, cut the treats into squares or bars. Enjoy your sweet creation!
Tips & Tricks
Perfecting the Texture
To make your Rice Krispie treats super gooey, add extra mini marshmallows. This simple step creates delightful pockets of marshmallow goodness. When you fold in the extra marshmallows, you will notice the fun chewy bits throughout.
Pressing the mixture can get sticky. Here’s how to avoid that. First, grease your hands with butter or dip them in water. This way, the mixture won’t stick to your fingers. Use a greased spatula for extra help. Press down gently but firmly to keep it even.
Serving Suggestions
Serving your treats can be fun and creative. Arrange the squares on a bright platter. This makes a lovely display for parties. You can also add some flair by topping each treat with sprinkles or mini marshmallows.
Want to gift them? Consider packaging each square in clear bags. Tie them with colorful ribbons for a cute touch. This makes a sweet gift for friends and family.
Storage Advice
To keep your Rice Krispie treats fresh, store them in an airtight container. This helps to lock in the moisture. Place a piece of wax paper between layers if you stack them.
For longer freshness, keep them at room temperature. Avoid the fridge, as it can make them hard. If you need to store them for a while, wrap them tightly in plastic wrap. This keeps them gooey and tasty for days!
Pro Tips
- Use Fresh Ingredients: Always use fresh mini marshmallows for the best flavor and texture. Stale marshmallows may not melt properly, leading to a less enjoyable treat.
- Press Firmly: When pressing the mixture into the baking dish, ensure you press down firmly and evenly. This helps the treats hold their shape and makes cutting easier later.
- Add Flavor Variations: Experiment with different extracts like almond or coconut in place of vanilla for unique flavor twists that can elevate your treats.
- Storage Tips: Store the treats in an airtight container at room temperature. This keeps them fresh and chewy for up to a week, or you can freeze them for longer shelf life.
Variations
Flavor Enhancements
You can make Rice Krispie Treats even better. Try adding peanut butter or chocolate. Both options give a rich taste. For peanut butter, mix in 1 cup while melting marshmallows. This will add a nice nutty flavor. If you love chocolate, fold in 1 cup of chocolate chips. You can also use flavored marshmallows. Try strawberry or caramel for a fun twist! These small changes can make your treats special.
Fun Additions
Mix-ins can take your treats to another level. Nuts, like walnuts or almonds, add crunch. Dried fruits, such as raisins or cranberries, provide sweetness. You can also top them with candy. M&Ms or mini chocolate bars create a colorful look. Frostings can be fun too! Drizzle melted chocolate or colored icing on top. These ideas let you customize your treats to fit any mood.
Themed Treats
Make Rice Krispie Treats for any season or holiday! For Halloween, shape them into ghosts or pumpkins. Use candy eyes for decoration. At Christmas, cut them into stars and add green and red sprinkles. You can use cookie cutters for fun shapes. For birthdays, arrange them on a cake stand. Decorate with candles or festive sprinkles. Themed treats make gatherings more exciting and memorable.
FAQs
What can I substitute for Rice Krispies?
You can use other cereals if you want a twist. Options include:
– Cornflakes
– Cheerios
– Crisped rice
– Granola
Each brings a unique flavor and texture. You can even mix different cereals for fun!
Can I make these dairy-free?
Yes, you can easily make these treats dairy-free. Here are some substitutes:
– Use dairy-free butter or coconut oil instead of unsalted butter.
– For marshmallows, look for brands that are vegan. They often use plant-based ingredients.
These swaps keep the treats delicious and friendly for all diets.
How do I add food coloring to the treats?
Adding color is simple! Here’s how:
1. Before adding the Rice Krispies, mix a few drops of food coloring into the melted marshmallow mix.
2. Stir well until the color is even.
3. Add more drops for deeper shades.
This way, you can create vibrant treats for any fun occasion!
Schema Information
Recipe Metadata
– Prep Time: 10 minutes
– Cook Time: 30 minutes
– Total Time: 40 minutes
– Servings: 12 servings
Nutritional Information
– Estimated calories per serving: About 150 calories
– Overview of key nutritional values: Each serving has carbs, fats, and protein. Rice Krispies provide carbs. Butter adds fats, and marshmallows offer some sugars. This treat is not a health food, but it’s fun and tasty!
Creating classic Rice Krispie treats is quick and easy. They are sweet and filled with gooey marshmallows. You can whip up a batch in just 10 minutes. For cooking, you need about 30 minutes to let the flavors come together and set. These treats serve about 12 people, making them perfect for sharing.
When you want a treat, this recipe is a great choice. It is simple to make, and kids love it. Plus, you can add your favorite toppings like sprinkles or chocolate chips. Enjoy these sweet delights at parties, picnics, or family gatherings!
You can create tasty Rice Krispie treats at home using a few simple steps. We discussed the key ingredients, from Rice Krispies to optional mix-ins. I shared how to melt butter and marshmallows for a smooth blend and tips for perfect texture. You also learned about storage and fun variations. With these ideas and methods, you can enjoy delicious treats that are fresh and fun. Now, gather your ingredients and start making your own Rice Krispie treats toda