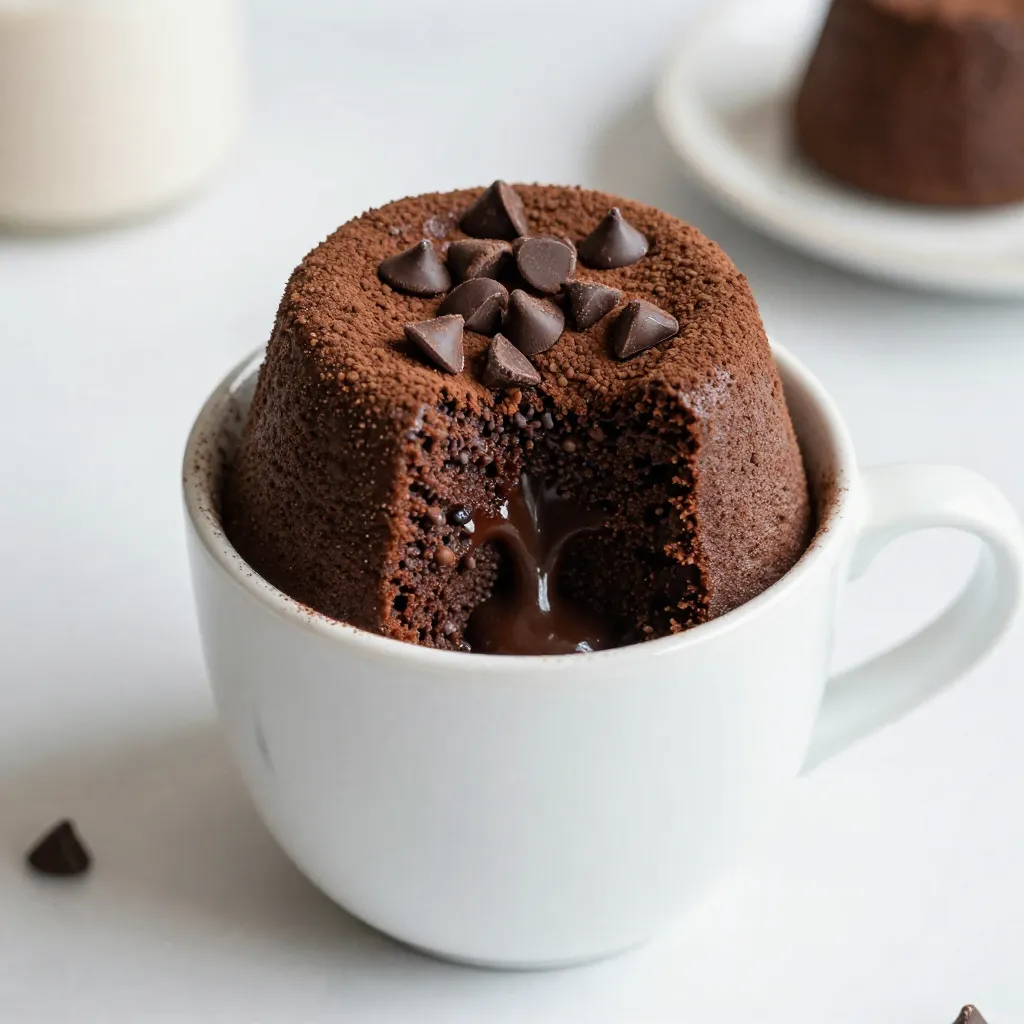
Looking for a quick and tasty treat? A Chocolate Lava Mug Cake is just what you need! This simple dessert is warm, gooey, and perfect for chocolate lovers. With just a few ingredients and a microwave, you can create a decadent dessert in minutes. Let’s dive into the recipe and discover how to impress your taste buds with this delightful mug cake!
Why I Love This Recipe
- Quick and Easy: This mug cake can be whipped up in just a few minutes, making it the perfect dessert for any occasion when you’re short on time.
- Decadent Chocolate Flavor: The combination of cocoa powder and chocolate chips creates a rich, chocolatey experience that satisfies your sweet tooth.
- Customizable: Feel free to experiment with different add-ins, like nuts or fruit, to make this mug cake your own, catering to your personal taste.
- Single Serving Delight: Perfectly portioned for one, you can indulge in this delicious treat without the temptation of leftovers!
Ingredients
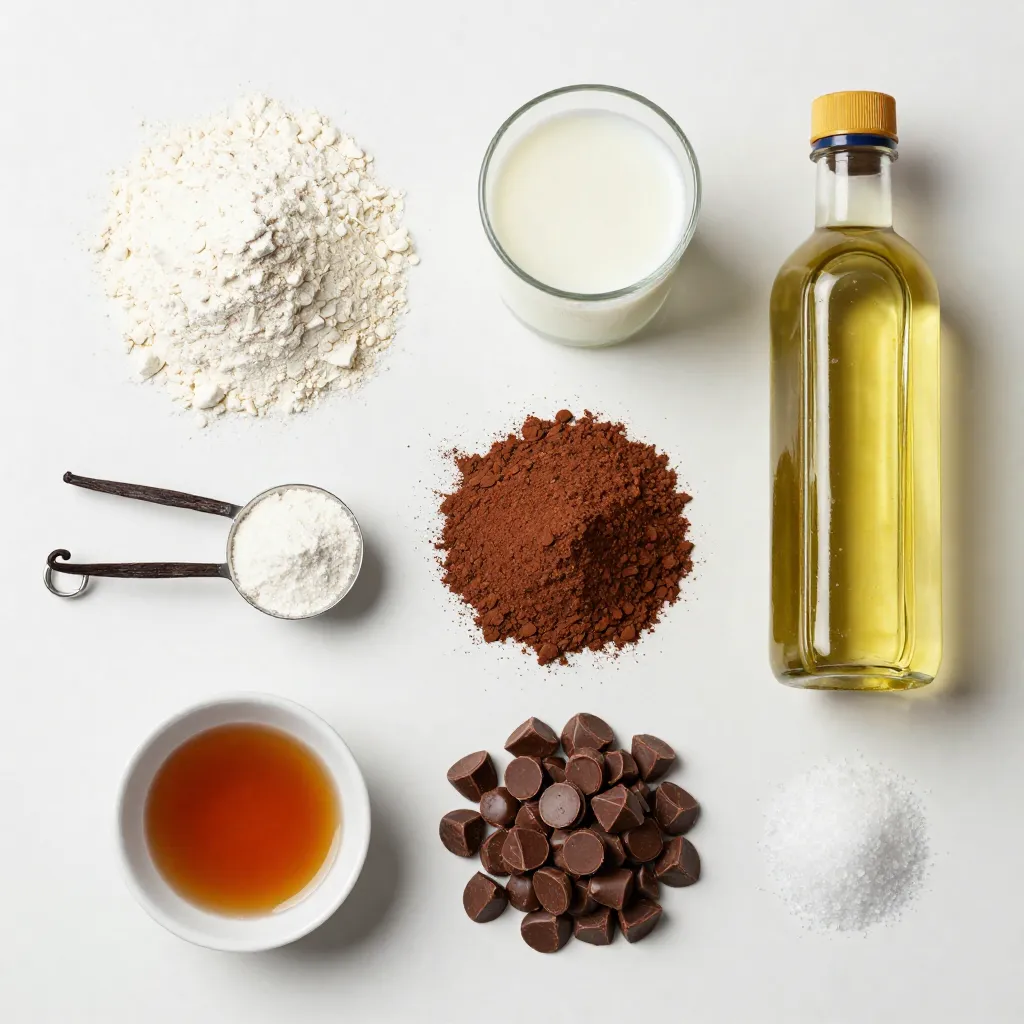
List of Required Ingredients
– 4 tablespoons all-purpose flour
– 4 tablespoons granulated sugar
– 2 tablespoons unsweetened cocoa powder
– 1/8 teaspoon baking powder
– A pinch of salt
– 3 tablespoons milk
– 2 tablespoons vegetable oil
– 1/4 teaspoon pure vanilla extract
– 1 tablespoon semi-sweet chocolate chips
When making your chocolate lava mug cake, gather all your ingredients first. Each item plays a key role in creating that rich, gooey center. The all-purpose flour helps the cake rise, while granulated sugar adds sweetness. Cocoa powder gives it that deep chocolate flavor.
Baking powder acts as a leavening agent, making your cake fluffy. A pinch of salt enhances the flavors beautifully. Milk adds moisture, and vegetable oil keeps it tender. The vanilla extract brings warmth to the dish. Finally, the semi-sweet chocolate chips will melt to create that delightful lava effect.
Recommended Tools
– Microwave-safe mug
– Mixing utensil (whisk or fork)
– Microwave
Next, you need the right tools. A microwave-safe mug is a must. It holds your cake and makes it easy to cook. Use a whisk or fork to mix your ingredients well. Finally, a microwave is your best friend for this quick treat. Make sure to keep an eye on it while it cooks.
Step-by-Step Instructions
Preparation
Combining dry ingredients
Start with a microwave-safe mug. In this mug, mix:
– 4 tablespoons all-purpose flour
– 4 tablespoons granulated sugar
– 2 tablespoons unsweetened cocoa powder
– 1/8 teaspoon baking powder
– A pinch of salt
Use a small whisk or fork. Stir until no lumps remain. Make sure it is all blended well.
Mixing wet ingredients
Now, pour in:
– 3 tablespoons milk
– 2 tablespoons vegetable oil
– 1/4 teaspoon pure vanilla extract
Stir this mixture vigorously. You want a smooth batter, free of lumps.
Baking the Mug Cake
Cooking time and monitoring
Place your mug in the microwave. Cook on high for 40 to 60 seconds. Keep an eye on it! The cake will rise and set at the edges.
Ensuring the gooey center
Check the center. It should look soft and gooey, not dry. If it looks set, stop the microwave. Avoid overcooking, as this can ruin the texture.
Cooling and Serving
Allowing the cake to cool
After cooking, take out the mug. Let it cool for about one minute. This helps the molten center stabilize.
Presentation tips
Serve the cake warm for the best taste. For extra joy, add a scoop of vanilla ice cream or whipped cream. You can sprinkle more chocolate chips or cocoa powder on top for a nice look. Enjoy your delicious lava delight!
Tips & Tricks
Microwave Cooking Tips
– Adjusting cooking time based on wattage
Your microwave’s wattage affects cooking time. Higher wattage cooks quicker. Start with 40 seconds. If it’s not set, add 10 seconds. Watch carefully.
– Signs of doneness
The edges should set, while the center looks slightly wet. If the top rises and appears firm, it’s ready. Don’t overcook.
Ingredient Substitutions
– Alternative flours
You can swap all-purpose flour with whole wheat or almond flour. Each flour offers a unique taste and texture. Adjust the liquid if needed.
– Dairy-free options
Use almond milk or coconut milk instead of regular milk. This keeps the cake moist and tasty.
Perfecting the Texture
– Avoiding overmixing
Mix gently once you add the chocolate chips. Overmixing can make the cake tough. A few lumps are okay.
– Achieving a molten center
The key is to cook just enough. The center should stay gooey. If it looks too firm, you may have cooked it too long. Enjoy that delicious, warm chocolate surprise!
Pro Tips
- Use a Larger Mug: Opt for a slightly larger mug to prevent overflow during cooking, as the cake will rise significantly in the microwave.
- Experiment with Flavors: Enhance your mug cake by adding a dash of espresso powder or a sprinkle of cinnamon for a unique twist on the classic chocolate flavor.
- Check Microwave Power: Since microwave wattage varies, start with 40 seconds and add time in 10-second increments to avoid overcooking.
- Add Toppings: Elevate your mug cake by adding toppings like crushed nuts, fresh berries, or a drizzle of caramel sauce for extra indulgence.
Variations
Flavor Additions
You can change the taste of your lava mug cake easily. Use different types of chocolate. Dark chocolate gives a rich taste. Milk chocolate is sweet and smooth. White chocolate adds creaminess. You can also add nuts. Chopped walnuts or pecans add a nice crunch. Fresh fruits like raspberries or strawberries can bring a burst of flavor. Just fold them in gently before microwaving.
Healthier Alternatives
Want a lighter version? Try whole grain flour instead of all-purpose flour. It adds fiber and nutrients. You can also reduce the sugar. Use only three tablespoons instead of four. This keeps it sweet but cuts back on calories. You might even try a sugar substitute if you prefer. This way, you still enjoy your treat guilt-free!
Themed Mug Cakes
Make your mug cake special for any season. For winter, add peppermint extract for a minty twist. In fall, pumpkin spice brings warmth and comfort. You can also create fun holiday themes. Top with colorful sprinkles or edible glitter for festive cheer. Use themed mugs to match the season. It makes your dessert even more fun!
Storage Info
Storage Recommendations
To keep your chocolate lava mug cake fresh, store any leftovers in the fridge. Place it in an airtight container. This helps maintain its moist texture. If you plan to eat it later, cover it well. When you’re ready to enjoy it again, you can reheat it. Simply pop it in the microwave for about 15 to 20 seconds. Check it after heating to ensure it warms evenly.
Shelf Life
You should eat your chocolate lava mug cake within two days for the best taste. After that, it might start to dry out or lose flavor. Signs of spoilage include a hard texture or an off smell. If you notice either, it’s best to toss it. Always prioritize your health and enjoy your treats fresh!
FAQs
How do I make a chocolate lava mug cake?
To make a chocolate lava mug cake, start by mixing dry ingredients in a microwave-safe mug. Combine 4 tablespoons of all-purpose flour, 4 tablespoons of granulated sugar, 2 tablespoons of cocoa powder, 1/8 teaspoon of baking powder, and a pinch of salt. Use a whisk or fork to blend them well.
Next, add 3 tablespoons of milk, 2 tablespoons of vegetable oil, and 1/4 teaspoon of vanilla extract. Stir until you have a smooth batter. Fold in 1 tablespoon of semi-sweet chocolate chips.
Microwave the mug for 40 to 60 seconds. Keep an eye on it to ensure it rises nicely. The edges should set, while the center stays gooey. Let it cool for a minute before digging in.
Can I use a different cooking method?
Yes, you can bake your mug cake in the oven. Preheat the oven to 350°F (175°C). Pour the batter into an oven-safe ramekin instead of a mug. Bake for about 10 to 12 minutes. Check for a set edge and a soft center. This method gives a different texture but is still delicious.
What other toppings can I use?
You can add many tasty toppings to your mug cake. Here are some ideas:
– A scoop of vanilla ice cream
– Whipped cream
– Fresh berries
– Chopped nuts
– A drizzle of chocolate or caramel sauce
– Dusting of powdered sugar or cocoa powder
Feel free to get creative with your toppings!
Now you know how to make a delicious mug cake with simple steps and few ingredients. From mixing the dry and wet components to the perfect cooking time, every detail matters. You can add your twist with variations and substitutions. Remember to store your cake right for fresh taste later. Feel free to experiment with flavors and toppings. Enjoy your baking, and savor each gooey bit